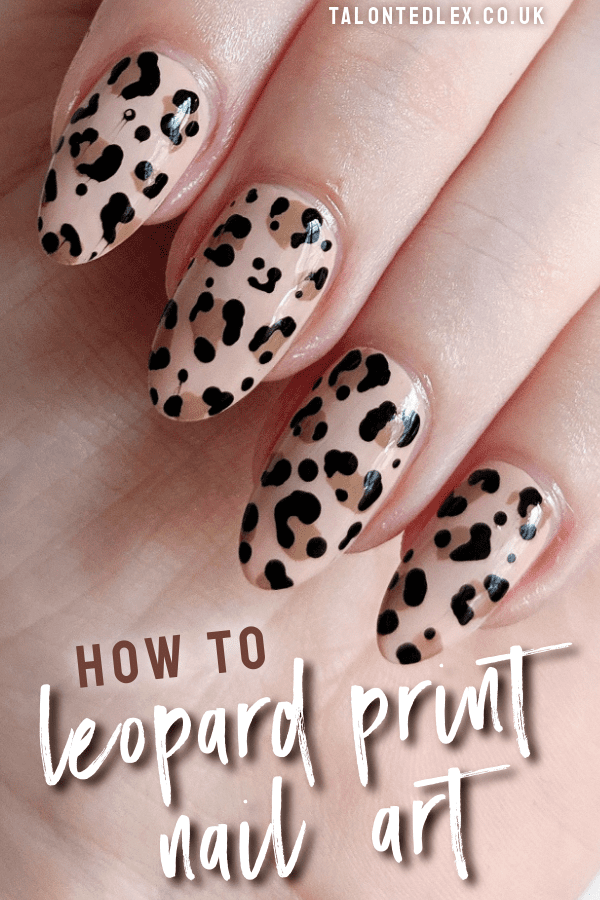
Today I’m throwing it back to my nail blogger roots with a nail art tutorial. For those of you who don’t know, my blog started as a nail blog (hence the nail pun name!) and painting my nails is still one of my favourite ways to relax. Whenever I’m lacking inspiration, leopard print nail art is always my go-to look so it was a no-brainer when I asked on Instagram if people would like to see some quick nail art tutorials.

The video above is pretty self explanatory (I hope!) but here are the basic steps, along with some tips and information on the products used.
- STEP ONE: Paint your nails with your chosen base coat (I used essie ‘spin the bottle’*). Do as many coats as you need to for a full coverage finish.
- STEP TWO: Using a contrasting colour, dot irregular shapes onto the nail. I used Barry M ‘Tiki Hut’* which is now only available on Amazon.
- STEP THREE: Pour a blob of another contrasting shade onto some foil/shiny card (anything that won’t absorb the polish) I used essie ‘licorice’.
- STEP FOUR: Using a dotting tool, apply the leopard print markings. I’d recommend looking at some Google images of leopard print to inspire you, but I describe it as messy u-shapes and joined up dots! You can practice on your foil beforehand to see what looks best. TIP: If you don’t want to buy a dotting tool especially, you can unfold a hair pin and use the tip of that.
- STEP FIVE: (Unlike me…) wait a little while before applying top coat to avoid streaking. And you’re done!
I hope you found this tutorial helpful – if you try it I would love to see, so please tag me or send me the link! And let me know what nail art tutorial you would like to see next.
Lex
*PR samples. Links may be affiliate. For more information please see the Disclaimer and Privacy Policy tabs at the top of the page.
== SAVE TO PINTEREST TO TRY LATER! ==

Loved this thanks x
This leopard print nail art tutorial is absolutely fabulous! I love how you broke down each step so clearly. Can’t wait to try this out for my next girls’ night! Thanks for the inspiration!